A Complete Guide to Reverse Osmosis System Installation Under the Sink
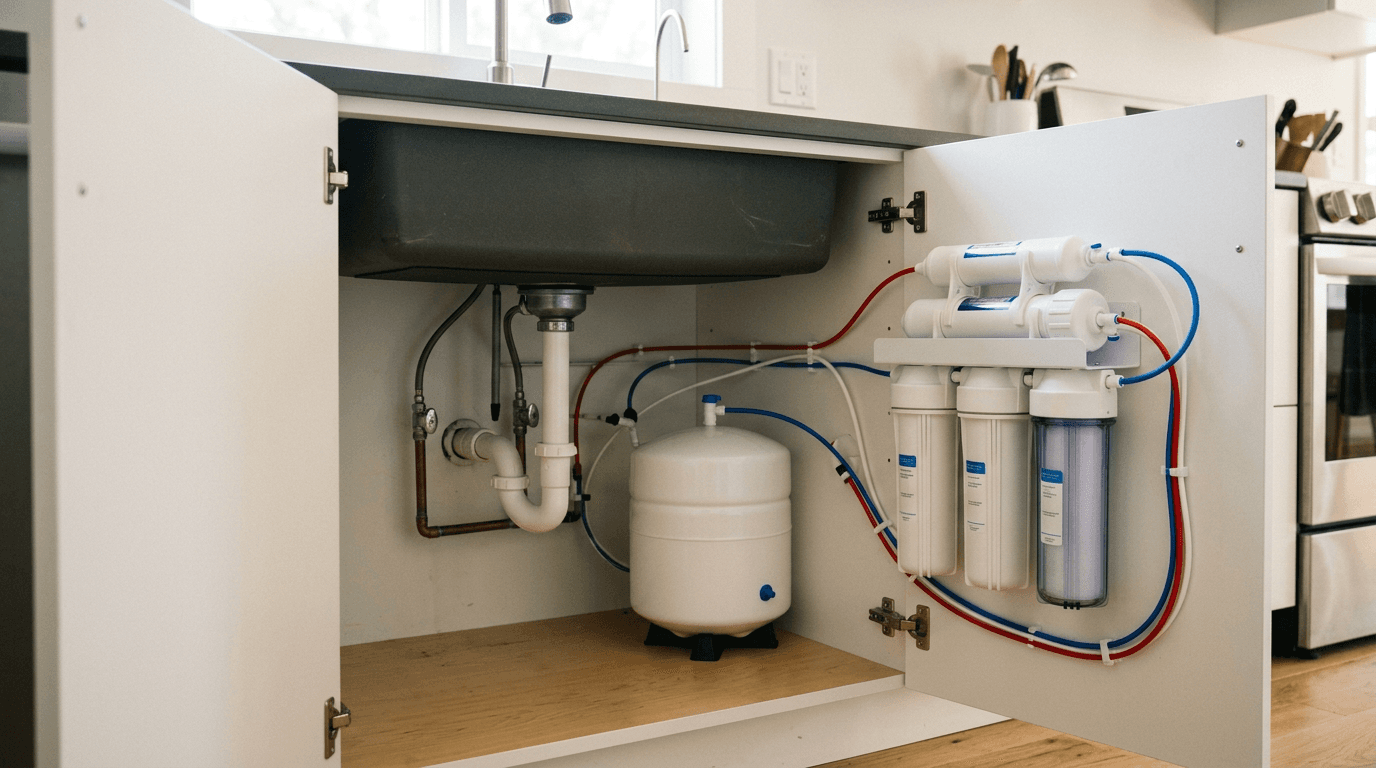
Drilling through a quartz or marble countertop to mount a dedicated faucet is the exact moment most homeowners realize that installing a reverse osmosis system is a structural modification to the kitchen, not just a plumbing adjustment. When done correctly, the system sits quietly under the sink, turning hard, chlorine-heavy tap water into pristine drinking water. When rushed, it results in slow leaks behind cabinets, air gaps that spit water onto the counter, or a storage tank that never quite fills. Understanding how each component interacts with your home's water pressure and drainage prevents these failures.
Quick Summary
Reverse osmosis system installation involves connecting a multi-stage filtration manifold to your cold water supply, routing the purified water to a dedicated faucet, and directing the wastewater through a saddle valve into your sink's drain pipe. It requires modifying existing plumbing under the sink and establishing a secure, leak-free pressurized loop.
- Countertop material dictates how the dedicated RO faucet must be mounted.
- The drain saddle must sit above the P-trap to prevent sewer gas backflow and contamination.
- Tubing must be cut perfectly square to seat correctly inside push-to-connect fittings.
- A newly installed system requires a full tank flush to purge manufacturing fines from the carbon filters before the water is safe to drink.
Table of Contents
- Tools and Preparation Before You Start
- 1. Mounting the RO Faucet
- 2. Tapping the Cold Water Line
- 3. Installing the Drain Saddle
- 4. Positioning the Storage Tank and Filter Assembly
- 5. Connecting the Tubing
- 6. Pressurizing and Flushing the System
- Common Pitfalls & Troubleshooting
- FAQ
- Recommended Reads
Tools and Preparation Before You Start
Installing a reverse osmosis water filter system demands specific tooling and an understanding of your local water profile. In regions like Edmonton, Beaumont, Leduc, and Sherwood Park, the water hardness averages 165 mg/L. Hard water scales up the delicate semi-permeable membrane of an RO system prematurely if left untreated. This is why many homeowners opt for a Triton Pure package that combines a whole-home water softener with the under-sink reverse osmosis unit, protecting the RO membrane from calcium and magnesium fouling.
Before opening the box, assess the space beneath your kitchen sink. Standard tank-based systems require roughly a two-by-two-foot footprint. Tankless models like the Triton Pure Tankless package save space but require a dedicated 120V electrical outlet under the sink to power the internal pump. Gather your tools: a variable speed drill, masonry or diamond-tipped drill bits (if drilling through stone), a crescent wrench, a utility knife with a fresh blade for cutting tubing, and Teflon tape for threaded connections. Shut off the main water supply to the kitchen and open the existing faucet to bleed the line pressure.
1. Mounting the RO Faucet
The most intimidating step in reverse osmosis drinking water system installation is mounting the dedicated faucet. Standard kitchen faucets dispense hot and cold water at high volumes. An RO faucet dispenses purified water at a slower, controlled rate and sits off to the side.

If your sink already has a pre-drilled accessory hole covered by a blanking plate (often used for soap dispensers), you can use that opening. If not, you must drill a hole. Stainless steel sinks require a cobalt drill bit and a punch to prevent the bit from walking. Quartz, granite, or marble countertops require a diamond hole saw. You must drill slowly, applying consistent, light pressure while using a steady trickle of water to keep the bit cool. Overheating the bit or pushing too hard will crack the stone, resulting in an expensive replacement.
Once the hole is prepared, feed the faucet shank through the opening. If you are installing an air-gap faucet - recognizable by the three tubes extending from its base rather than just one - ensure the drain lines face backward toward the wall for easier routing. Slide the rubber gasket, washer, and locking nut onto the shank from beneath the sink. Tighten the nut with a basin wrench until the faucet is firmly seated and does not twist when you turn the handle.
2. Tapping the Cold Water Line
The RO system needs a feed source, which is always the cold water line. Tapping the hot water line will instantly destroy the RO membrane, as the synthetic material melts and degrades under high temperatures.
Locate the cold water shut-off valve under the sink. Turn it clockwise to ensure it is completely closed. Disconnect the flexible braided hose that runs from the valve to your main kitchen faucet. The reverse osmosis filter installation kit will include a feed water adapter, usually a brass or plastic T-fitting. Thread this adapter onto the existing shut-off valve. If the adapter uses compression fittings, apply three wraps of Teflon tape to the male threads to ensure a watertight seal. Reconnect the braided faucet hose to the top of the T-fitting.
The side port of the T-fitting connects to the quarter-inch tubing that feeds the RO system. Most modern adapters use a push-to-connect fitting for this line. Push the tubing into the fitting until you feel it slide past the internal O-ring and hit the stop. Give it a gentle tug to verify the internal metal teeth have bitten into the plastic. Keep the shut-off valve closed while you complete the rest of the installation.
3. Installing the Drain Saddle
Reverse osmosis works by forcing water against a membrane; the pure water passes through, while the rejected water - containing concentrated dissolved solids - washes down the drain. This wastewater needs a secure path into your home's plumbing.
The drain saddle must be installed on the vertical or horizontal tailpiece of the sink drain, but it must ALWAYS sit above the P-trap. Installing the saddle below the P-trap allows sewer gases to travel up the drain line and vent into your kitchen through the RO faucet's air gap.
To install, mark a spot on the drain pipe at least two inches above the P-trap and away from the garbage disposal connection if possible. Drill a quarter-inch hole squarely into the side of the pipe, piercing only one side. Do not drill entirely through the pipe.
Practical rule: Align the hole in the rubber drain saddle gasket perfectly with the hole you just drilled by pushing a screwdriver or drill bit through both pieces while you tighten the saddle bolts.
Tighten the two bolts on the drain saddle evenly. Over-tightening can crush thin PVC pipes, while under-tightening will result in a leak when the system flushes. If your system uses an air gap, attach the larger 3/8-inch drain tubing from the faucet to the drain saddle, ensuring a constant downward slope with no loops or sags where water can pool.
4. Positioning the Storage Tank and Filter Assembly
With the faucet, water supply, and drain secured, you must place the core components. For a traditional under-sink tank system, positioning dictates how easily you will be able to perform future maintenance.

Place the filtration manifold - the bracket holding the pre-filters, RO membrane, and post-filter - against a side wall of the cabinet. Most manifolds have keyhole slots for screw mounting. Mounting the unit elevates it off the floor, protecting it from minor under-sink spills and making filter changes significantly easier. Ensure there is enough clearance below the filter housings to unscrew them using the provided filter wrench.
The storage tank, which typically holds 2 to 3 gallons of purified water, is surprisingly heavy when full. Place it on a flat, sturdy surface near the front or side of the cabinet. Apply Teflon tape to the threaded post on top of the tank, and carefully thread on the tank shut-off valve. Do not over-tighten this plastic valve, as it will crack. Keep the tank valve in the closed position during the initial setup.
For households short on cabinet space, a tankless RO model removes the storage tank entirely, relying on an internal electric pump to push water through the membrane on demand. If you are installing a tankless unit, ensure the power cord reaches the under-sink outlet without stretching or pulling on the unit.
5. Connecting the Tubing
The plumbing logic of a reverse osmosis system is managed through a series of color-coded polyethylene tubes. Connecting them incorrectly is the leading cause of system failure.
First, take your utility knife and ensure every cut you make on the tubing is perfectly square. A slanted cut will not seal against the O-ring inside a push fitting, causing a slow, persistent leak. Do not use scissors, as they will crimp the tubing out of round.
Route the tubing logically:
- Run the feed line from the cold water adapter to the port marked "IN" on the pre-filter stage.
- Run a line from the "OUT" port of the RO membrane housing to the storage tank.
- Run a line from the final polishing carbon filter up to the dedicated RO faucet.
- Route the wastewater line from the flow restrictor on the membrane housing to the drain saddle (or to the air gap on the faucet, and then to the drain saddle).
Leave a small amount of slack in each line so the components can be moved slightly for filter changes, but avoid long, looping runs that can kink or catch on household items stored under the sink. Insert locking clips (the small plastic horseshoes provided in the kit) behind the collar of every push-to-connect fitting to prevent the tubing from blowing out under pressure.
6. Pressurizing and Flushing the System
The final step is to bring the system online. This is not as simple as turning the water back on and pouring a glass. The system must be pressurized carefully to check for leaks, and the new filters must be flushed of manufacturing dust.
First, leave the tank valve closed. Slowly open the cold water shut-off valve under the sink. You will hear water rushing into the pre-filters. Wait two minutes. Check every connection, every housing thread, and the feed adapter for micro-leaks. Wipe a dry paper towel over the fittings; if it comes away damp, you have a leak. Shut the water off, push the tubing in further, and try again.
Once the feed side is secure, open the valve on the storage tank and turn the handle on the RO faucet to the open position. It takes time for water to force its way through the membrane. After ten to fifteen minutes, you should hear water trickling into the drain and see a slow drip emerging from the RO faucet. The water will likely be gray or black. This is harmless carbon dust washing out of the new post-filters.
Close the RO faucet and let the storage tank fill completely. This usually takes two to three hours depending on your home's water pressure. Once the tank is full (you will stop hearing water running down the drain), open the faucet and let the entire tank drain until it runs dry. This purges the preservative chemicals packed inside the RO membrane and clears out the final carbon fines. Let the tank fill a second time. The system is now ready for use.
Common Pitfalls & Troubleshooting
Even precise installations can present symptoms that look alarming. Accurately diagnosing these issues prevents unnecessary part replacements.
Water constantly running down the drain
Symptom: You hear a continuous hissing or trickling in the drain pipe, even hours after the tank should be full. Fix: The most common culprit is a failed automatic shut-off valve (ASV). The ASV is designed to stop the feed water when the tank pressure reaches a specific threshold. If it fails, the system runs infinitely. The fix is replacing the ASV block. A secondary, less common cause is extremely low home water pressure (under 40 PSI), which prevents the tank from reaching the shut-off threshold.
Air gap faucet leaking onto the counter
Symptom: Water spits or overflows from the small vent hole at the base of the RO faucet. Fix: The drain line running from the faucet down to the saddle valve is obstructed. This is usually caused by the tubing sagging and creating a "U" shape where water pools, or by a piece of food debris clogging the saddle hole. Disconnect the drain line, clear any blockages, and trim the tubing so it slopes directly downward into the drain pipe without loops.
Low water pressure at the tap
Symptom: The tank is full, and the system is heavy, but water barely trickles out of the RO faucet. Fix: The air bladder inside the storage tank has lost its charge. The tank uses a pocket of compressed air to push water up to the faucet. If this air leaks out, the water stays trapped inside. Empty the tank completely, locate the Schrader valve (like a bicycle tire valve) on the bottom of the tank, and use a bicycle pump to add air until it reads between 5 and 7 PSI. If the bladder is ruptured, the entire tank must be replaced.
Cloudy or milky water
Symptom: Freshly poured water looks white, but clears up from the bottom up after a minute. Fix: This is trapped air dissolving into the water, not a contaminant. It is entirely normal for a newly installed reverse osmosis system to produce micro-bubbles for the first week or two. No fix is required; the air will bleed out of the system naturally over time.
FAQ
Do I need a plumber to install an under-sink RO system?
Most homeowners with basic hand tools can complete the installation in under three hours. You only strictly need a professional if your plumbing is heavily corroded, if you are uncomfortable drilling through stone countertops, or if local building codes require a licensed installer for drain line modifications.
Why is my tankless RO system making a vibrating noise?
Tankless systems use an internal booster pump to force water through the membrane rapidly. A slight humming or vibrating noise during operation is the pump running. If the noise is excessive, ensure the unit is sitting flat on the cabinet floor and that none of the plastic tubing is vibrating against the cabinet walls.
How often should I change the filters in my new system?
Carbon and sediment pre-filters must be changed every 6 to 12 months to protect the membrane from chlorine damage. The semi-permeable membrane itself usually lasts 2 to 3 years, depending on the hardness of your source water.
Does an RO system soften the water?
An RO system removes the minerals that cause hardness, providing pure water at the drinking tap. However, hard water will scale and destroy an RO membrane quickly over time. It is highly recommended to use a water softener ahead of the RO system to treat the whole home and protect the filtration unit.