How to Install an Under Sink Water Filter and Reverse Osmosis System
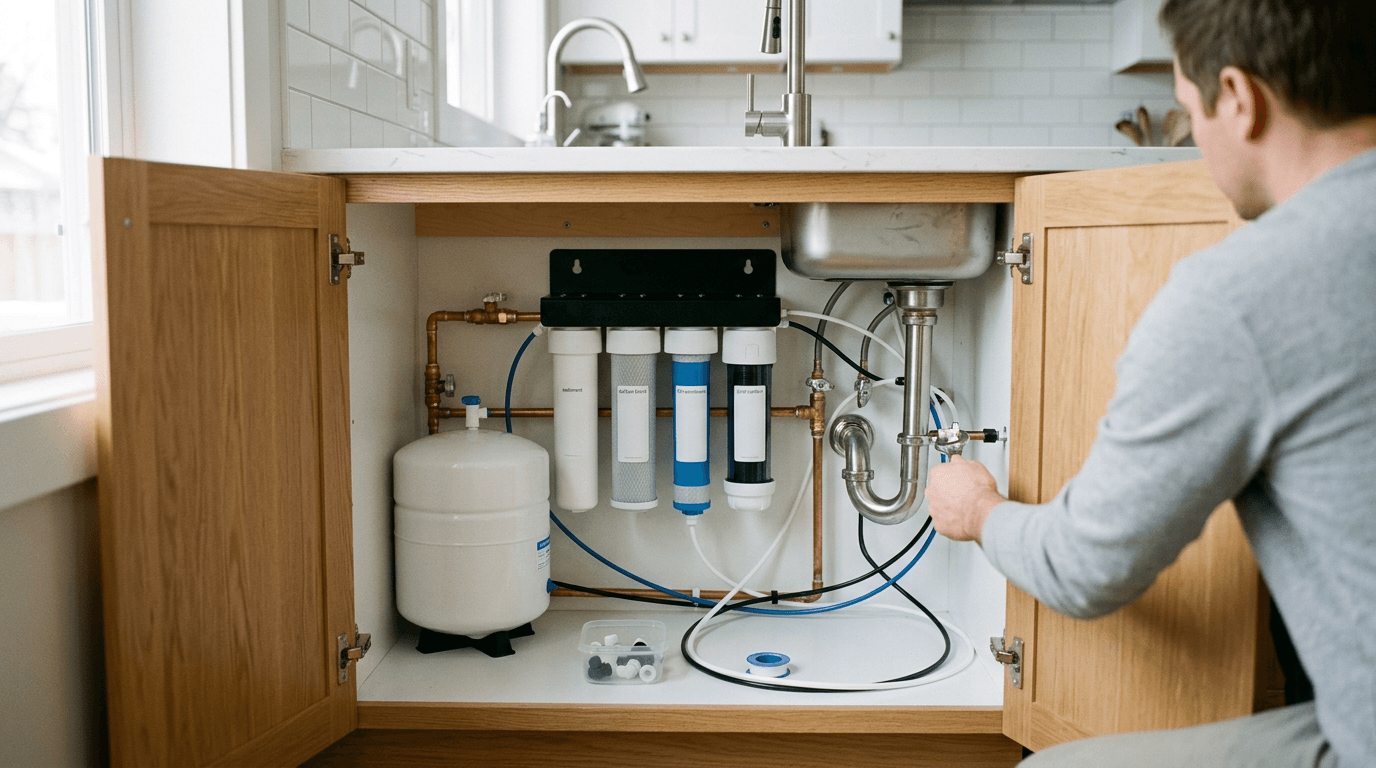
Most homeowners decide they need an under sink water filter only after making their morning coffee and noticing that distinct, flat chalkiness masking the roast. In regions across the Edmonton area, including Beaumont, Leduc, and Sherwood Park, the municipal water supply carries a heavy mineral load - frequently hitting 165 mg/L or 9.6 grains per gallon of hardness - alongside fluctuating chlorine levels. Treating this water at the kitchen sink requires more than just threading a braided hose onto a generic cartridge. It demands matching the system's micron rating and membrane design to the specific dissolved solids leaving your tap. This guide details how to evaluate your plumbing, select the right membrane technology, and install the pipework so you get genuinely purified water rather than exhausting a basic carbon block in a matter of weeks.
Quick Summary
A kitchen water filtration unit removes dissolved solids, chlorine, and municipal treatment byproducts before they reach your glass, utilizing either multi-stage activated carbon or semi-permeable membranes. Installing one correctly requires verifying your under-cabinet spatial clearances, matching the filtration stages to your local water chemistry, and executing airtight pipe connections at both the cold feed line and the dedicated dispenser tap.
- Test your tap water to isolate exactly which contaminants you need to filter.
- Measure your under-cabinet clearance before committing to a tank-based or tankless unit.
- Secure all push-connect fittings fully past their internal O-rings to prevent micro-leaks.
- Flush the new membranes thoroughly to clear manufacturing dust and preservatives before consuming the water.
Table of Contents
- Why an under sink water filter fails without correct local staging
- 1. Map out your plumbing and sink clearance before buying
- 2. Match the filtration technology to your water test results
- 3. Position and mount the filtration housing
- 4. Install the dedicated sink water filter tap
- 5. Connect the feed water and drain saddles for reverse osmosis
- 6. Flush the system and pressure test the connections
- Common Pitfalls & Troubleshooting
- FAQ
- Recommended Reads
Why an under sink water filter fails without correct local staging
Municipal treatment plants rely on robust chemical dosing to ensure water remains biologically safe as it travels miles through aging underground infrastructure. By the time that water reaches a residential kitchen, it carries a heavy load of disinfection byproducts, dissolved minerals, and seasonal sediment. Relying on a single-stage carbon filter attached to the end of a faucet only temporarily masks the aesthetic issues of taste and odour; it does not mechanically separate heavy metals or deeply dissolved solids from the supply. A proper installation intercepts the feed line before the faucet, running the water through sequenced chambers that handle sediment, chlorine reduction, and ultimately microscopic dissolved solids. Understanding how these stages interact with your exact regional water profile dictates whether your system delivers a decade of clean drinking water or breaks down under mineral scale in less than a year.
1. Map out your plumbing and sink clearance before buying
Will the new equipment actually fit? Open your sink cabinet before buying hardware. Look for the cold water shut-off valve and note your uninterrupted vertical space. Most filtration units tap into a 3/8-inch or 1/2-inch cold water line. Identifying this valve size dictates whether you need a specialized feed adapter. Measure the physical footprint available, accounting for the garbage disposal, dishwasher drain hoses, and pull-out trash cans. A traditional reverse osmosis setup involves a large pressurized storage tank that consumes roughly half a standard cabinet. Modern continuous-flow designs require less floor space but often need a dedicated electrical outlet nearby.

Why spatial planning dictates your system type
Homeowners frequently buy a system based on purification specs without measuring their cabinet. The unit physically cannot sit upright. If forced into a horizontal position, standard housings can leak. Storage tanks might not drain properly due to misaligned internal bladders. The critical failure here is ignoring the swing radius of a plumbing wrench. You cannot reach the shut-off valve if the system is wedged tightly against the back wall. Any future leak becomes catastrophic. Always measure a clearance box that includes room for your hands, required electrical outlets for advanced units, and vertical lifting space for future filter replacements.
2. Match the filtration technology to your water test results
Municipal water varies drastically by region, and installing the wrong media means you either waste money on unnecessary stages or fail to remove the actual contaminant. In areas dealing with 165 mg/L (9.6 grains per gallon) of hardness alongside heavy chlorination, basic carbon pitchers do virtually nothing. You need to pull a local water report or conduct a direct test. When evaluating under sink reverse osmosis water filter systems, understand that they strip water down to a molecular level, removing both beneficial minerals and harsh chemicals to provide a bottled-water equivalent right at the kitchen tap.
Hard water scaling destroys standalone membranes
The mechanical reality of a reverse osmosis under sink water filtration system is that the membrane utilizes microscopic pores. If you feed 9.6 grains per gallon hard water directly into it without a whole-home softener upstream, calcium and magnesium will scale over those pores within months, dropping your water pressure to a trickle. For complete residential coverage, combined solutions like the Triton Pure package (which pairs whole-home softening with a traditional tanked RO) or the Triton Pure Tankless package ensure that the water hitting the under-counter membrane is already soft. This staging prevents premature membrane death. The common mistake is purchasing a high-end filtration unit for hard water without addressing the hardness first, resulting in costly, frequent membrane replacements. Consult an Edmonton Water Hardness & Quality Guide to see exactly what your municipal supply carries before choosing your final configuration.
3. Position and mount the filtration housing
With the system selected, position the main manifold inside the cabinet. Do not simply rest the bracket against the cabinet wall and drive screws into it; you must first map the routing for the colour-coded tubing. The feed line, the line to the dispenser, and the waste line must all reach their destinations without severe bends or kinks that restrict flow over time.
Gravity and maintenance access determine placement
The mechanics of filter replacement rely on vertical drop space. Most modern housings require you to twist the filter body and pull downward to disengage the internal O-rings. The most frequent installation mistake is mounting the manifold flush with the bottom floor of the cabinet. When it is time for a filter change six months later, the homeowner discovers they cannot drop the cartridge low enough to clear the mounting head, forcing them to completely uninstall the entire manifold just to swap a single carbon block.
Practical rule: Mount the filter manifold exactly high enough that the bottoms of the cartridges sit two inches above the cabinet floor, providing just enough clearance to twist and drop them out freely.
4. Install the dedicated sink water filter tap
Delivering purified water requires a dedicated sink water filter tap mounted alongside your main kitchen faucet. If your sink deck does not have an existing accessory hole (often covered by a soap dispenser or a blanking plate), you will need to drill one. This requires specific tooling based on your countertop material - standard bi-metal hole saws work for stainless steel sinks, while granite or engineered quartz requires a specialized diamond-grit hole saw to prevent catastrophic fracturing.
Drilling counters requires specific thermal control
The mechanics of drilling stone involve grinding rather than cutting, which generates intense, localized heat. The common mistake people make here is running a diamond bit dry at high speed. This superheats the quartz resin or the natural stone, causing thermal shock that sends a highly visible crack running across the entire countertop. To prevent this, build a small dam out of plumber's putty around the drilling site and fill it with a shallow pool of water to cool the bit. Keep the drill speed low and let the weight of the tool do the work. Once the hole is established, secure the dispenser stem through the deck, ensuring the rubber gasket is firmly compressed against the counter to prevent dishwater from leaking into the cabinet below.
5. Connect the feed water and drain saddles for reverse osmosis
The final plumbing phase connects the unit to your home's water supply and wastewater system. First, shut off the cold water valve and install the feed water adapter between the valve and the existing faucet line. Then, route the tubing into the unit's pre-filter stage. For an undersink reverse osmosis water filter system, you must also install a drain saddle to carry the rejected wastewater safely into your home's plumbing stack.
Pipe position prevents drain blockages
A properly connected under sink reverse osmosis water filter system separates purified water from rejected brine. That brine requires a permanent pathway to the sewer. The drain saddle clamps onto your existing sink tailpiece, requiring a small hole drilled into the PVC. The fundamental mistake installers make is mounting this saddle on the bottom side of a horizontal pipe run or after the P-trap. If mounted horizontally, grease and food debris from the sink will settle over the RO drain hole, clogging it and causing the system to back up into the filters. Always drill the drain hole on a vertical section of the tailpiece, above the P-trap water line, so the reject water falls cleanly away. Secure the push-to-connect tubing firmly into the saddle, pulling back slightly to ensure the internal collet's metal teeth have bitten into the plastic.
6. Flush the system and pressure test the connections
With all tubing routed, slowly open the cold water supply valve. Do not fully open it immediately; crack it slightly to let the system pressurize gently. Check every single connection point for drips, running your dry fingers along the bottom of the push-fittings, the feed adapter, and the threaded base of the dispenser tap. Any moisture indicates a poorly seated tube that will eventually blow out under municipal pressure.
Preservatives and carbon fines require exhaustive flushing
Carbon block filters are manufactured with loose carbon dust, and semi-permeable membranes are shipped coated in a food-grade preservative to prevent bacterial growth during transit. The mechanics of the first run involve flushing these byproducts out of the media entirely. The mistake eager homeowners make is drinking the first glass of water produced. It will taste bitter, metallic, and look cloudy. You must let a tankless system run continuously for 15 to 20 minutes, or fill and completely drain a traditional storage tank at least twice before consuming the water. During this flushing phase, you may notice micro-bubbles in the water - this is trapped air purging from the manifold and is entirely normal. For detailed expectations on operating these setups, reviewing Reverse Osmosis System Installation procedures can clarify what a fully functional cycle should look like.
Common Pitfalls & Troubleshooting
Even with careful installation, filtration setups occasionally present symptoms that require specific diagnostics. Identifying the distinct failure saves you from replacing components that are not actually broken.
- A sudden, severe drop in water flow at the tap:
- Symptom: The dispenser tap only produces a trickle of water, or outputs a single cup before slowing to a complete stop.
- Fix: This is the most common failure point. If you do not have a whole-home softener installed, this is almost always a fouled membrane caused by hard water scaling. If a softener is present, the issue is typically a loss of air charge in the storage tank. Repressurize the empty storage tank to 7-8 psi using a standard bicycle pump.
- Continuous water running down the drain:
- Symptom: You hear a constant hissing or trickling sound from the sink drain pipe long after the storage tank should be full.
- Fix: This is most often a failed Automatic Shut-Off (ASO) valve, which is designed to cut the feed water once tank pressure pushes back. Replace the ASO valve to stop the unit from endlessly wasting water down the sewer.
- Leaking from push-to-connect tubing joints:
- Symptom: Small beads of water form at the collets where the plastic tubing enters the manifold.
- Fix: The tubing was likely cut at an angle or not pushed past the internal O-ring. Turn off the water, depress the collet ring, pull the tube out, re-cut the end perfectly square with a sharp blade, and push it back in firmly until you feel it seat fully past the seal.
- Loud gurgling noises when the system is operating:
- Symptom: The drain pipe gurgles loudly every time the system processes water.
- Fix: The drain saddle hole is not perfectly aligned with the fitting, causing the reject water to spray wildly inside the PVC pipe rather than flowing smoothly down the wall. Loosen the saddle clamp, realign the hole with a drill bit, and retighten carefully.
FAQ
How often do I need to change the pre-filters on an under-sink system?
For municipal water supplies, carbon and sediment pre-filters typically require replacement every 6 to 12 months. Failing to change them on schedule exposes the delicate main membrane to chlorine degradation and heavy sediment, which will cause the entire system to fail prematurely.
Can I connect an under-sink RO system to my refrigerator ice maker?
Yes, you can run a T-fitting off the purified water line to feed a refrigerator. However, ensure the distance is relatively short and that your system generates enough pressure to push the water to the fridge; otherwise, your ice maker will produce hollow, undersized cubes.
Will an under-sink filter remove water hardness scale?
No. Under-sink systems process drinking water but do not protect your household plumbing, water heater, or dishwashers from scale buildup. Hardness must be treated at the point of entry with a whole-home softener before it distributes through the house.
What is the difference between a tankless and a traditional tank RO system?
Traditional systems use a pressurized bladder tank to store purified water slowly over time, taking up significant cabinet space. Tankless systems use powerful internal pumps to push water through highly efficient membranes on demand, providing continuous flow while saving space, though they require access to a dedicated electrical outlet.