Professional Guide to Whole House Water Filter System Installation
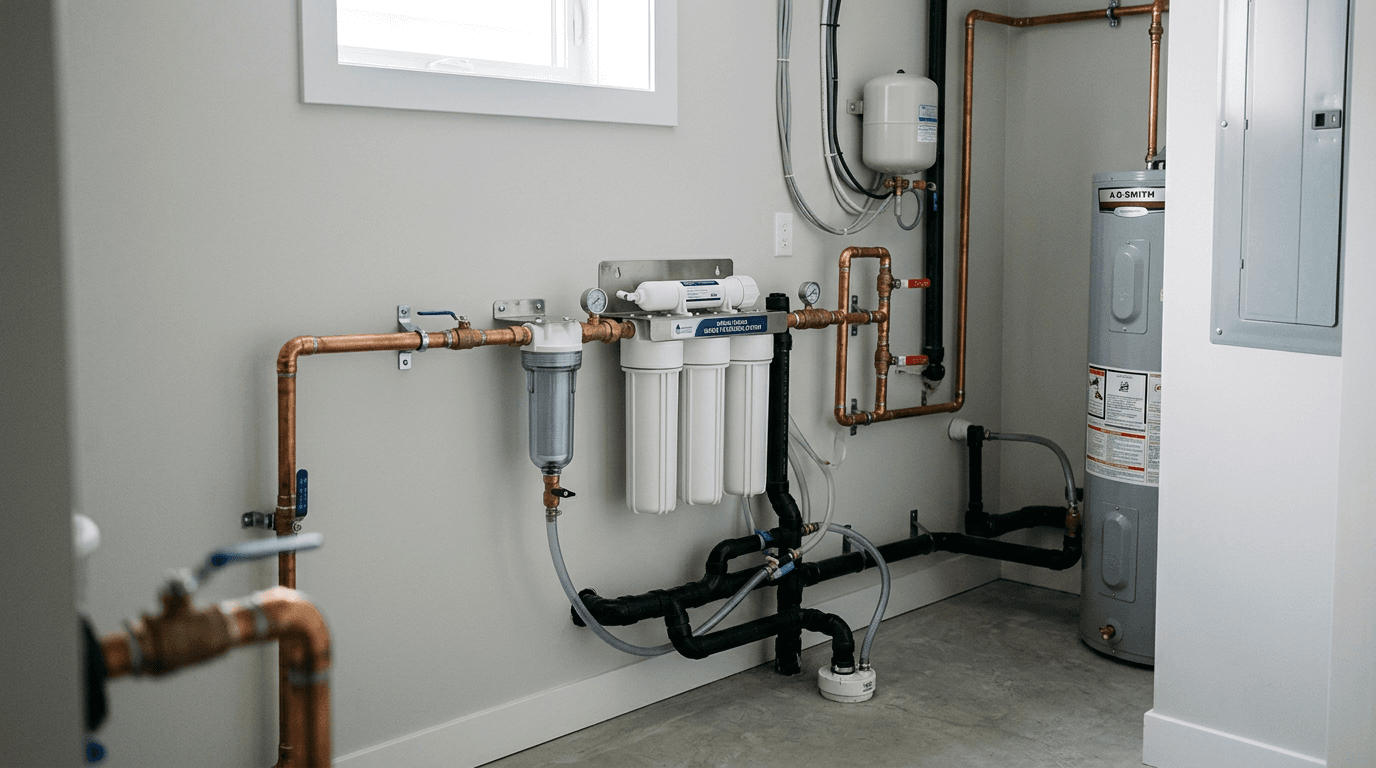
Most homeowners only realize their plumbing configuration cannot support a new filtration unit after they have already cut the main water line and flooded the basement mechanical room. Undertaking a water filter installation requires more than just connecting pipes; it demands a precise understanding of water pressure dynamics, bypass mechanics, and localized water chemistry. In areas like the Edmonton capital region, where municipal water hardness averages 165 mg/L (9.6 grains per gallon), the equipment must be properly sized and securely installed to handle significant mineral loads and chlorine levels without restricting household flow rates.
Quick Summary
A proper whole house water filter system installation integrates municipal water treatment directly into the home's main supply line before it splits to the water heater.
- Professional installations prioritize correct bypass valve configuration to ensure water flow during maintenance.
- Systems must be rated for the specific flow rate (GPM) of the household to prevent pressure drops.
- Assessing space constraints and floor drainage is critical before any pipe cutting begins.
- Utilizing combined systems like Triton Pure packages requires dedicated drain line considerations.
Table of Contents
- Why Proper Assessment Prevents Catastrophic Leaks
- Where DIY Approaches Fail the Homeowner
- Common Pitfalls & Troubleshooting
- FAQ
- Recommended Reads
Why Proper Assessment Prevents Catastrophic Leaks
The installation of water filter system components begins long before wrenches touch the plumbing. The mechanical room must be evaluated for sufficient vertical clearance, proximity to a floor drain, and access to electrical outlets if the system requires a control valve. Many homeowners attempt a water filter diy approach only to discover their chosen location lacks an adequate drain for system backwashing, forcing them to rely on buckets or jury-rigged drain hoses that inevitably leak. Professional installers in Sherwood Park and surrounding areas always map the installation footprint first, ensuring the system can be serviced easily without dismantling surrounding ductwork or plumbing.

1. Evaluating the Main Water Line
The first step involves identifying the point of entry where the municipal water line enters the home. This must be prior to the water heater and, ideally, before any irrigation branches to avoid treating outdoor water unnecessarily. You must verify the pipe material - copper, PEX, or CPVC - as this determines the cutting tools and fitting types required. Failing to account for pipe material differences leads to improper seals and eventual bursting. Check the existing static water pressure using a gauge on a hose bib; if it exceeds 80 PSI, a pressure reducing valve must be installed to protect the new filtration equipment from stress fractures.
2. Shutting Off and Draining the Supply
Once the location is mapped, the main shutoff valve must be completely closed. A common mistake here is assuming the valve holds fully. Older gate valves often fail to seat properly, allowing a slow trickle of water that makes soldering copper pipes impossible. To check this today, close your main valve and open the lowest tap in the house. If water continues to drip after five minutes, the main valve must be replaced before the filtration system can be integrated. Open the highest tap in the home to break the vacuum, allowing the water in the lines to drain fully from the lowest tap.
Practical rule: Always position a 5-gallon bucket and a large towel directly under the intended cut site before opening any pipe, regardless of how thoroughly you believe the system is drained.
3. Cutting the Pipe and Installing Bypass Valves
With the system drained, the main line is cut to accommodate the bypass assembly. The bypass valve is a critical component that allows water to circumvent the filter during maintenance or filter changes, ensuring the home never loses water access. When executing a water filter system installation, installers cut out a section of pipe corresponding to the bypass valve's width, accounting for the insertion depth of the fittings. Using a specialized pipe cutter ensures a square, clean cut without deforming the pipe walls. The bypass is then fitted - using sweat soldering for copper, or crimp rings for PEX - and must be perfectly aligned to prevent lateral stress on the filter housing connections, which will cause hairline cracks over time.
4. Mounting and Connecting the Filtration Unit
The physical positioning of the tanks or housings comes next. For heavy systems like whole-home dechlorination carbon tanks, the unit must sit on a perfectly level concrete floor to prevent the tank from leaning and stressing the manifold connections over time. When dealing with combined setups like the Triton Pure or Triton Pure Tankless packages, specific plumbing paths must be established for both the softening resin tanks and the reverse osmosis components. The inlet of the filter must connect to the incoming municipal supply, and the outlet connects to the home's distribution manifold. Reversing these connections will flush the filtration media directly into the home's plumbing, destroying fixtures and appliances.
5. Pressurizing the System and Checking for Leaks
The final step is introducing water back into the home's plumbing framework. The bypass valve must initially be in the "bypass" position while the main shutoff is opened slowly. Opening the valve too quickly sends a hydraulic shock, or water hammer, through the empty pipes, which can blow out weak joints. Once the main line is pressurized and verified leak-free, the bypass valve is partially opened to allow water to fill the filtration unit slowly, pushing trapped air out through a nearby open faucet. Only when a steady, sputtering-free stream of water flows from the tap should the bypass be fully opened.
Where DIY Approaches Fail the Homeowner
Many property owners in Leduc attempt to save on upfront costs by undertaking the installation themselves. The primary mechanism of failure in amateur installations is improper fitting torque. Threaded connections on filter housings are typically plastic, while the incoming fittings are often brass or stainless steel. Over-tightening a metal fitting into a plastic housing creates micro-fractures in the plastic thread that may hold pressure for a week before catastrophically splitting while the homeowner is asleep or at work. Conversely, under-tightening leads to persistent weeping leaks that encourage mold growth in finished basements. Relying on professional installation guarantees that fittings are sealed with the correct amount of Teflon tape and tightened to exact specifications, backed by workmanship guarantees.
Common Pitfalls & Troubleshooting
System failures post-installation usually present as one of three distinct issues, requiring specific diagnostic steps.
Sudden Drop in Household Water Pressure
- Symptom: Opening a second tap causes the shower pressure to plummet to a trickle.
- Cause: The filtration system installed has a lower flow rate capacity (GPM) than the household demands, or the internal media was not flushed properly and has compacted.
- Fix: Verify the system's rated GPM against your household requirement. If adequate, place the system in bypass to see if pressure returns; if it does, the media tank requires a manual backwash cycle to loosen compacted carbon or resin.
Persistent Weeping at Connection Joints
- Symptom: A slow, continuous drip from the inlet or outlet manifold connections that does not stop after wiping.
- Cause: This is most often the real cause of installation failure: cross-threading or insufficient Teflon tape on NPT fittings joining dissimilar materials (metal to plastic).
- Fix: The system must be depressurized, the fitting completely removed, the old tape cleaned off with a wire brush, and re-wrapped with 4-5 wraps of high-density plumbing tape before being carefully re-threaded.
Cloudy or Gray Water at All Taps
- Symptom: Water appears milky or gray immediately after installation and does not settle clear.
- Cause: The carbon filtration media was not subjected to a thorough initial rinse, allowing carbon dust (fines) to enter the home's distribution pipes.
- Fix: Do not run hot water, as carbon fines will settle in the water heater tank. Run the cold water tap closest to the filter (often the laundry tub) at high volume for 15-20 minutes until the water runs completely clear, flushing the system.
FAQ
Does a whole-home filter lower my water pressure?
A correctly sized system will not noticeably reduce your water pressure. However, a system rated for 5 GPM installed in a home requiring 12 GPM will cause severe pressure drops when multiple fixtures are used simultaneously.
Can I install a whole-house filter if I already have a water softener?
Yes, but sequence matters. Filtration systems, such as dechlorination carbon tanks, should be installed before the water softener to protect the softener's resin beads from chlorine degradation.
Do I need an electrical outlet for the installation?
Standard carbon filter housings and basic dechlorination tanks operate on water pressure alone and do not require electricity. However, systems that perform automatic backwashing or combine softening capabilities require a standard 120V outlet.
How do I know if my bypass valve is open or closed?
Most modern bypass assemblies use arrow indicators on the valve handles. When the arrows point in the direction of the pipes (inline), water is flowing through the filter. When the arrows point directly at each other, the filter is bypassed.