Reverse Osmosis Maintenance: A Complete Guide for Edmonton Homes
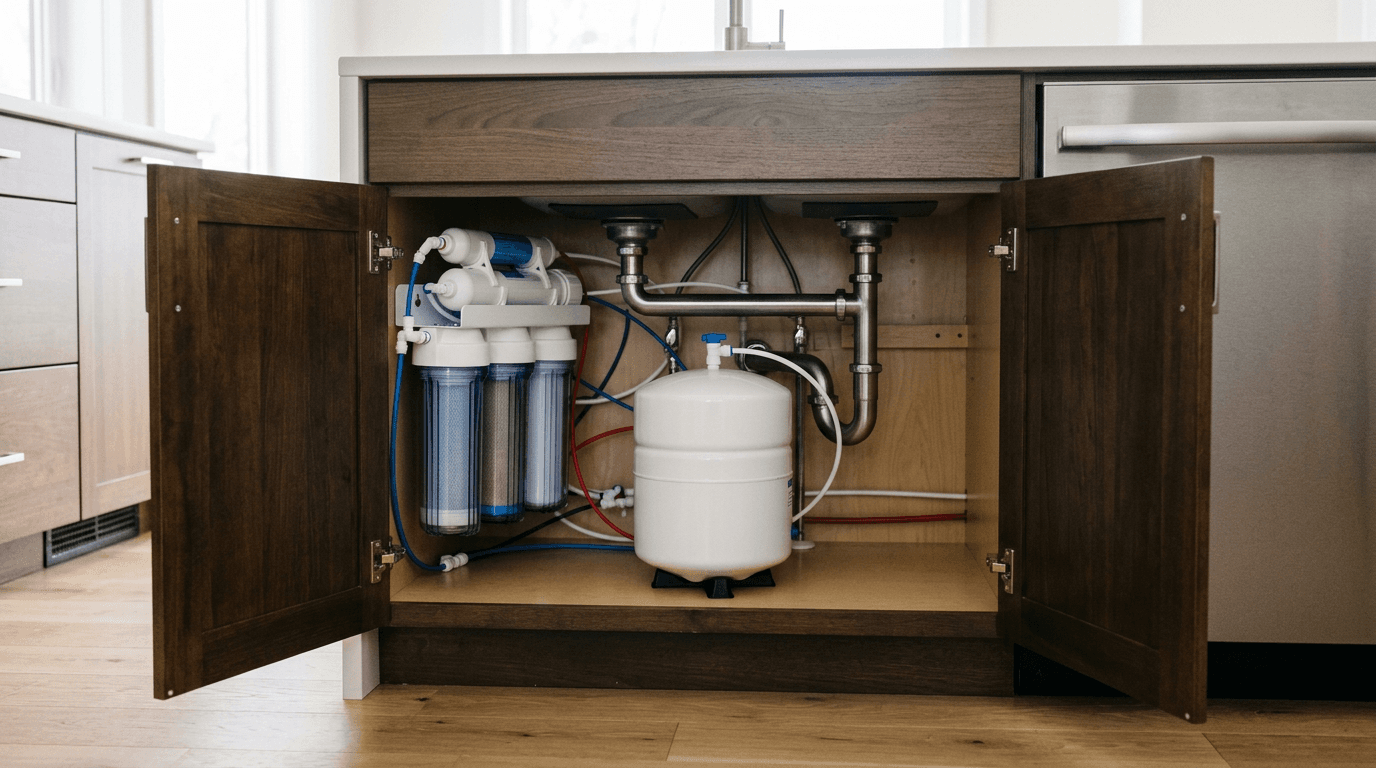
Water that tastes metallic or smells faintly of chlorine when it leaves an under-sink spout is the clearest sign an owner has missed a service window. A reverse osmosis system is not a permanent, hands-off appliance; it is a series of degrading barriers that need routine replacement to keep separating dissolved solids from drinking water.
Quick Summary
Reverse osmosis system maintenance involves replacing pre-filters, carbon filters, and the semi-permeable membrane on a set schedule, alongside annual sanitization of the storage tank and lines. Neglecting these steps leads to fouled membranes, reduced water pressure, and contaminated drinking water.
- Pre-filters and carbon filters require replacement every 6 to 12 months.
- The reverse osmosis membrane typically lasts 2 to 3 years.
- The entire system must be sanitized annually to prevent bacterial growth.
- Failing to change pre-filters allows chlorine to destroy the RO membrane.
Table of Contents
- 1. Change the Pre-Filters and Carbon Filters
- 2. Replace the Reverse Osmosis Membrane
- 3. Sanitize the Storage Tank and Lines
- 4. Check the Storage Tank Pressure
- Common Pitfalls & Troubleshooting
- FAQ
- Recommended Reads
1. Change the Pre-Filters and Carbon Filters
The first stage of any reverse osmosis system consists of sediment and carbon pre-filters. These components protect the delicate, expensive reverse osmosis membrane from large particles and harsh chemicals.
The sediment filter catches rust, sand, and dirt. If it clogs, the entire system loses water pressure, and the RO membrane receives too little flow to operate correctly. The carbon pre-filter absorbs chlorine. Chlorine physically burns holes in thin-film composite (TFC) RO membranes. If the carbon filter is saturated and allows chlorine to pass through, the membrane will be destroyed in weeks.
Most homeowners wait for a drop in water pressure to change these filters. By the time flow is restricted, the carbon filter has likely already failed to stop the chlorine.
Practical rule: Replace the sediment and carbon pre-filters every 6 to 12 months, regardless of how the water tastes or flows.
How to replace the pre-filters
- Shut off the water supply: Turn the valve on the cold water line leading to the system. Also, close the valve on the top of the RO storage tank.
- Relieve pressure: Open the RO faucet at the sink to drain the remaining water in the lines.
- Remove the housings: Place a towel under the system. Use a filter wrench to loosen the filter housings by turning them left (counter-clockwise).
- Clean the housings: Discard the old filters. Wash the inside of the housings with warm water and a few drops of dish soap. Rinse thoroughly to ensure no soap remains.
- Inspect the O-rings: Check the rubber O-ring at the top of each housing. If it is flattened, stretched, or cracked, it will leak and must be replaced. Lubricate the O-ring with food-grade silicone grease (never petroleum jelly, which degrades the rubber).
- Install new filters: Drop the new filters into the correct housings. The sediment filter is usually first in line, followed by the carbon filter.
- Reassemble: Hand-tighten the housings back onto the manifold. Do not use the wrench to tighten, as this will make them impossible to remove next time.
2. Replace the Reverse Osmosis Membrane
The semi-permeable membrane is the engine of the RO system. It forces water through microscopic pores, leaving behind heavy metals, fluoride, and dissolved minerals.

Unlike pre-filters, the membrane does not absorb contaminants; it repels them down the drain. Because of this self-cleaning action, membranes last much longer than carbon filters - typically 2 to 3 years.
The mistake homeowners make is assuming the membrane is fine because the water still tastes okay. As a membrane fails, it allows more dissolved solids to pass through, but the change is gradual. Only a Total Dissolved Solids (TDS) meter can confirm if the membrane is still rejecting the vast majority of contaminants as required. A reading showing high TDS in the output water means the membrane is exhausted.
How to replace the membrane
- Disconnect the housing: Shut off the water and tank, and open the faucet to relieve pressure. Locate the membrane housing (usually horizontal across the top). Remove the tubing from the cap.
- Open the cap: Unscrew the cap of the membrane housing.
- Extract the old membrane: Grab the stem of the old membrane with pliers and pull it straight out. It may be tight due to mineral buildup.
- Clean the housing: Wash the inside of the housing with warm water and soap. Rinse completely.
- Insert the new membrane: Push the new membrane in, ensuring the end with the two black O-rings goes in first. You must feel it seat firmly into the manifold at the bottom. If it is not seated, water will bypass the membrane entirely.
- Reconnect: Replace the cap and reattach the tubing.
3. Sanitize the Storage Tank and Lines
A reverse osmosis system removes chlorine before the water reaches the storage tank. This leaves the tank and the lines leading to the faucet vulnerable to bacterial growth, especially if the system sits unused for weeks.
Sanitization kills bacteria and removes slime that can build up inside the dark, unchlorinated environment of the tank. Skipping this step during annual maintenance of a reverse osmosis system often leads to a persistent swampy or earthy taste in the water, even with brand new filters.
How to sanitize the system
- Remove all filters: Take out the pre-filters, carbon filters, the RO membrane, and the post-carbon filter. Empty the housings and reattach them empty.
- Add sanitizer: Pour 2 to 3 tablespoons of unscented household bleach (or an RO-specific sanitizer) into the first filter housing (where the water enters the system).
- Fill the system: Turn the cold water supply on and open the tank valve. Let the system fill until water comes out of the RO faucet. Close the faucet and let the system sit for 30 minutes.
- Flush the system: Open the RO faucet and let the entire tank drain. Wait for it to fill again, and drain it completely a second time to ensure all bleach is removed.
- Reinstall filters: Shut off the water, drain the system, and install the new filters and membrane as described above.
4. Check the Storage Tank Pressure
The storage tank uses a pressurized air bladder to push water up to the faucet. If this bladder loses pressure, the tank will fill with water but fail to deliver it to the tap. The homeowner often misdiagnoses this as a clogged filter.
Checking the tank pressure requires a tire pressure gauge and a bicycle pump. The tank must be completely empty of water to get an accurate reading.
How to check and adjust tank pressure
- Empty the tank: Shut off the cold water supply. Open the RO faucet until the water stops flowing. If the tank feels heavy, it is still full of water, meaning the air bladder is completely flat.
- Locate the air valve: Find the Schrader valve on the tank (usually covered by a blue or black cap near the bottom).
- Check pressure: Use a low-pressure gauge to check the psi. It should read between 5 and 7 psi when empty.
- Add air: If the pressure is low, use a bicycle pump to add air carefully. Add a few pumps and check again. Do not use an air compressor, as it can rupture the bladder.
- Check for ruptures: If water comes out of the air valve when you press it, the bladder is torn, and the entire tank must be replaced.
Common Pitfalls & Troubleshooting
- Symptom: Low water flow at the faucet.
- Cause: The most common cause is a loss of air pressure in the storage tank, not a clogged filter.
- Fix: Empty the tank and check the air bladder pressure. If it is below 5 psi, repressurize it with a bicycle pump.
- Symptom: Continual water running down the drain.
- Cause: The automatic shut-off valve (ASV) has failed. The ASV is supposed to stop the flow of water to the drain once the storage tank is full. If it breaks, the system runs continuously.
- Fix: Replace the automatic shut-off valve.
- Symptom: Water tastes metallic or earthy.
- Cause: Either the carbon filters are exhausted, or the system has developed bacterial growth in the tank.
- Fix: Sanitize the entire system with unscented bleach and replace all filters, including the post-carbon polishing filter.
FAQ
How often should I change my reverse osmosis filters?
Pre-filters and carbon filters should be changed every 6 to 12 months. The reverse osmosis membrane should be replaced every 2 to 3 years. The final polishing filter is usually replaced annually.
Can I clean and reuse an RO membrane?
No. Residential reverse osmosis membranes cannot be backwashed or cleaned effectively. Once the pores are fouled with calcium or the membrane is damaged by chlorine, it must be replaced.
Why does my new RO system make a gurgling sound?
Air is trapped in the lines after a filter change or new installation. This is normal and will stop after the tank has filled and emptied a few times, pushing the air out through the drain line.
Does Edmonton water require a reverse osmosis system?
Edmonton's municipal water is considered hard (averaging 165 mg/L or 9.6 grains per gallon) and is treated with chlorine or chloramine. While safe, many homeowners choose RO systems to remove the chlorine taste and lower the total dissolved solids for drinking and cooking.