Reverse Osmosis System Installation: A Complete Guide for Clean Drinking Water
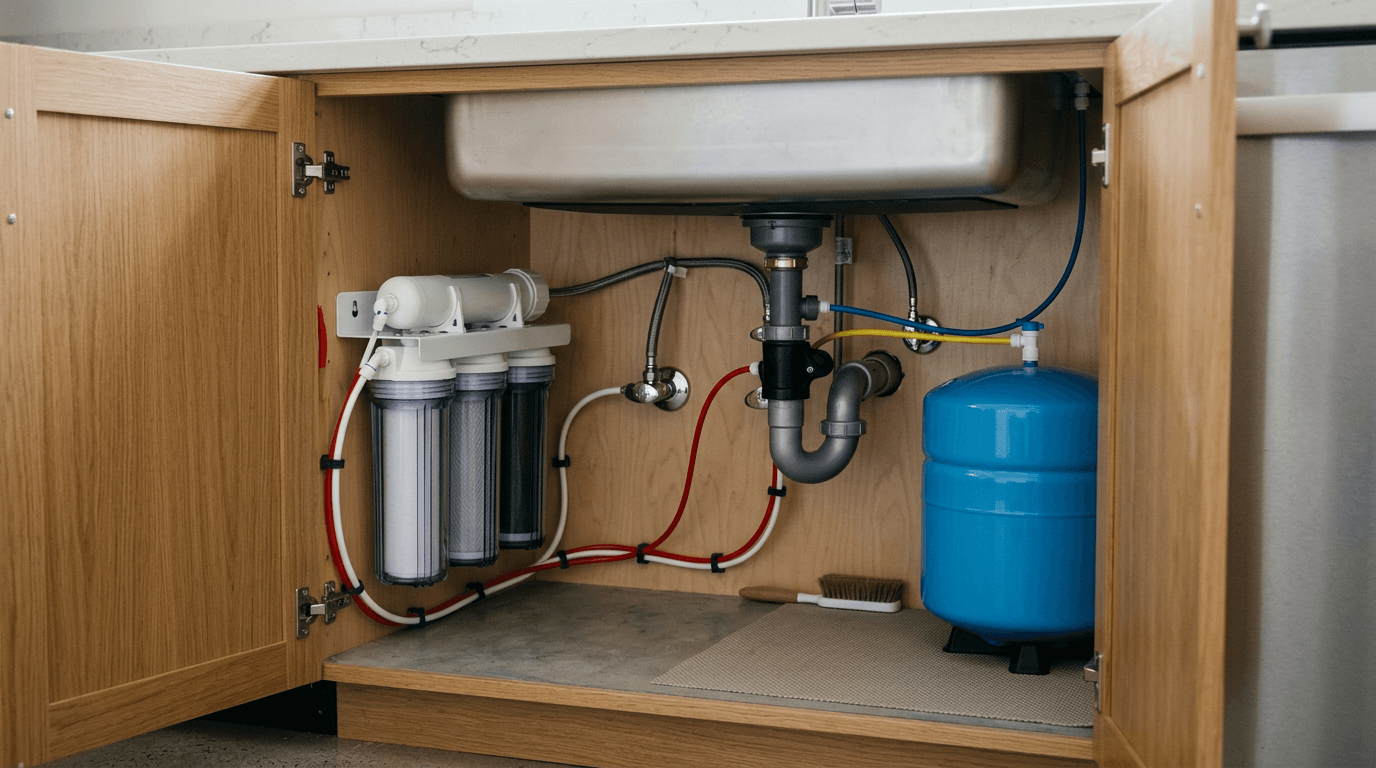
Picture the moment the shipping box arrives. You pull out a heavy plastic manifold, three pre-filter housings, a pressurized steel storage tank, and a coiled length of colour-coded polyethylene tubing. The instruction manual suggests a reverse osmosis system installation takes an hour, but you are staring at an older home's crowded under-sink plumbing, trying to decipher where a drain saddle can safely fit without compromising the sink's P-trap.
This is not a project where you can guess at connections. Municipal water pressure sits between 40 and 80 PSI; a single compromised fitting means catastrophic cabinet damage. Understanding the mechanics of cross-flow filtration and exactly how wastewater routes out of the manifold is the difference between a system that delivers pristine drinking water for a decade and one that floods your kitchen by tomorrow morning.
Quick Summary
A successful reverse osmosis installation requires precise tapping of the cold water feed, secure routing of a wastewater drain, and careful management of hydropneumatic tank pressure. Proper setup ensures bottled-quality drinking water, while skipping fundamental steps leads to constant draining, slow flow rates, or damaged filter housings.
- Always place the drain saddle above the P-trap on a vertical pipe section to prevent sewer gas contamination.
- Cut polyethylene tubing perfectly square to ensure the push-fitting O-rings seal correctly under pressure.
- Never add air pressure to a hydropneumatic storage tank while it holds water, as this ruptures the internal bladder.
- Change carbon pre-filters every six months to protect the delicate semi-permeable membrane from chlorine degradation.
Table of Contents
- Why a proper reverse osmosis system installation matters for membrane lifespan
- 1. Assess the under-sink space and supply line
- 2. Tap the cold water feed securely
- 3. Mount the drain saddle on the correct tailpiece
- 4. Position and pressurize the hydropneumatic tank
- 5. Route and cut the polyethylene tubing
- 6. Install the faucet and purge the carbon lines
- When reverse osmosis system maintenance becomes mandatory
- Common Pitfalls & Troubleshooting
- FAQ
- Recommended Reads
Why a proper reverse osmosis system installation matters for membrane lifespan
An under-sink RO system is not just a standard physical filter; it is a miniature water treatment plant. It splits incoming tap water into two separate streams: a purified permeate that goes to your faucet, and a reject brine that carries away the rejected contaminants. In the local region, municipal water supplied by EPCOR carries an average hardness of 165 mg/L (roughly 9.6 grains per gallon), alongside chemical chlorine used for disinfection. A semi-permeable thin-film composite (TFC) membrane physically cannot tolerate heavy chlorine exposure or massive scale buildup without degrading.
Consulting an Edmonton water hardness and quality guide confirms exactly what your pre-filters are fighting on a daily basis. If you are planning a reverse osmosis system installation in Edmonton, the plumbing execution directly dictates how well the pre-filters protect that central, expensive membrane. Because scale is the enemy of reverse osmosis, homeowners wanting comprehensive protection often deploy combined setups, such as the Triton Pure package, which pairs whole-home softening to remove calcium before it ever reaches the delicate point-of-use unit beneath the sink.
1. Assess the under-sink space and supply line

Where crowding creates tubing kinks
Before touching a wrench or shutting off the main water, you must map the physical footprint of the equipment. A standard RO manifold with three vertical housings requires at least 15 inches of vertical clearance to allow space for unscrewing the housings during future filter changes. The standard 3.2-gallon storage tank demands a 12-inch diameter footprint. You must account for physical obstructions like heavy garbage disposals, deep basin sinks, and sliding trash cans.
Identify the cold water shut-off valve. Usually, this is a 3/8-inch or 1/2-inch angle stop. Ensure a clear, unpinched route from that valve to where the manifold will mount. The specific mistake homeowners make here is forcing the manifold into a back corner directly behind a disposal unit. This forces the 1/4-inch polyethylene feed tubing into a tight, sharp bend. Tubing under constant municipal pressure will deform. It eventually kinks if radius tolerances are ignored. A kink restricts the incoming feed pressure. This starves the membrane. The system then drains continuously without ever filling the holding tank.
2. Tap the cold water feed securely
Why old plumbing requires manual threading
Cold tap water diverts into the RO pre-filters through a feed valve. Most modern kits provide a T-adapter. This is often called an add-a-tee or feed water adapter. It threads directly between your existing angle stop and the braided kitchen faucet line. First, shut off the cold water. Next, open the sink faucet to relieve line pressure. Finally, place a heavy towel underneath. This catches the residual water trapped in the braided line.
The mechanics involve compressing a rubber washer inside the female end of the adapter while using thread seal tape (PTFE) on the male threads to create a watertight connection. When installing a reverse osmosis water filter system, the critical failure point occurs through crossthreading. Many older homes feature calcified or slightly damaged copper threads on the angle stop. The mistake is using a wrench immediately to force the new brass or plastic adapter onto those stubborn threads. Always thread the adapter entirely by hand until it stops, ensuring it seats perfectly straight, before applying the final quarter-turn with an adjustable wrench. Overtightening will split a plastic adapter or crush the rubber washer inside a brass one, leading to a slow, persistent drip that rots the cabinet base.
3. Mount the drain saddle on the correct tailpiece
How horizontal placement causes echoing
Reverse osmosis purifies water by washing dissolved solids across the membrane and flushing them down the drain. This process requires a dedicated wastewater line. The drain saddle is a two-piece plastic clamp that secures this 1/4-inch reject line directly into your sink’s existing plumbing. The physical mechanics dictate that this saddle must clamp onto a vertical tailpiece completely above the P-trap. If you place it below the water seal of the trap, dangerous sewer gases will travel up the empty tubing and permanently foul the RO membrane with bacterial growth.
During a reverse osmosis filter system installation, the most common mechanical error is drilling through both walls of the ABS or PVC pipe. You must drill a 1/4-inch hole through one side only, stopping the drill bit immediately once it breaches the first wall. You must also clear the plastic burrs from the inside of the hole so hair and food debris do not catch on them. The second prevalent mistake is mounting the saddle on a horizontal pipe run. While physically possible to clamp, wastewater slowly dropping into a horizontal pipe creates a distinct, echoing gurgle in the kitchen every time the system processes water. Keep the saddle on a vertical drop so the reject water runs silently down the interior pipe wall.
4. Position and pressurize the hydropneumatic tank
Why adding air to a full tank ruins flow
Because the cross-flow filtration process is extremely slow - often producing just drops of permeate per minute - a storage tank is required to accumulate enough volume to deliver a pressurized stream at the kitchen faucet. Inside the steel or plastic outer shell is a flexible butyl rubber bladder. Beneath the bladder sits a sealed pocket of air, pressurized to exactly 5 to 7 PSI when empty. As the manifold forces purified water into the bladder, the air beneath it compresses. When you open your faucet, that tightly compressed air forcefully pushes the water out.
Homeowners who lack under-sink space often upgrade to advanced solutions like the Triton Pure Tankless system, which uses an internal electric booster pump to provide instant water on demand, eliminating the bulky tank entirely. If you are using a standard tank, the lethal mistake is checking or adjusting the air pressure after the tank has filled with water. If you apply a bicycle pump to the Schrader valve on the bottom of a heavy, full tank, you will over-pressurize and rupture the internal bladder. This forces the drinking water into the air chamber, destroying the tank permanently and dropping your faucet flow to a trickle.
5. Route and cut the polyethylene tubing

How angled cuts defeat O-ring seals
The plumbing connections on modern water manifolds rely almost entirely on John Guest-style push-to-connect fittings. Inside each collet is a stainless steel grab ring with sharp teeth and a soft rubber O-ring. When you push the tubing in, the teeth bite down to prevent it from backing out, while the O-ring seals tightly against the smooth outer wall of the tubing to hold back the water pressure.
Practical rule: Cut every piece of polyethylene tubing perfectly square using a dedicated tube cutter or a fresh utility knife blade; using scissors will crush the tube into an oval that permanently bypasses the internal O-ring seal.
The mistake that ruins custom cabinetry is an angled cut. If the tubing is cut at a bevel, one side of the plastic slips completely past the internal O-ring while the short side stops short of the seal. It will feel entirely secure when you tug on it because the metal teeth are fully engaged, but under 60 PSI of municipal pressure, water will silently bypass the unsealed section of the O-ring. This creates a hidden micro-leak that pools under the manifold over several days.
6. Install the faucet and purge the carbon lines
Why the first tank tastes intensely bitter
Mounting the dedicated drinking water faucet requires drilling a 1/2-inch or 5/8-inch hole in the sink deck or countertop. Once the fixture is mounted, the final connection runs from the manifold's post-filter directly to the threaded faucet base. However, a complete reverse osmosis drinking water system installation is not finished the moment the water is turned on; it requires a systematic purge to become safe.
The pre-filters and the final polishing filter are constructed of tightly extruded carbon blocks. When they are shipped, vibration breaks loose microscopic carbon dust. The mechanics of purging require you to open the cold water feed valve, let the tank fill completely (which takes 2 to 3 hours), and then lock the sink faucet open until the tank runs completely dry. The mistake is trusting the clear water that comes out of the faucet after only five minutes and drinking it. That early water carries suspended carbon fines and food-grade biological preservatives washed off the brand-new TFC membrane. It tastes intensely bitter, feels gritty on the teeth, and can cause mild stomach upset. Always drain the first two full tanks entirely before consuming the water.
When reverse osmosis system maintenance becomes mandatory
Routine reverse osmosis system maintenance is the only mechanism that protects the system's most expensive and critical component: the membrane itself. The membrane filters dissolved solids down to 0.0001 microns, but it is highly vulnerable to chemical degradation and mineral scaling.
To maintain optimal conditions, you must replace the sediment and carbon pre-filters every six months without fail. The sediment filter catches physical silt and rust from city pipes, preventing physical blockages, while the carbon block chemically absorbs municipal chlorine. If you skip this replacement cycle, the chlorine completely bypasses the exhausted carbon block and literally melts the microscopic pores of the TFC membrane, destroying its ability to reject contaminants.
The membrane itself typically requires replacement every 24 to 36 months, depending on the feed water hardness. Incorporating whole-home treatment, such as installing a water softening system in Sherwood Park or a dedicated softening unit in Beaumont, drastically reduces the scaling load on the under-sink membrane, effectively extending its operational life closer to the five-year mark. Homes operating a water softener in Spruce Grove find that removing calcium upfront stops the RO membrane from calcifying prematurely. When swapping any of these filters, you must wash the empty housings with unscented dish soap and lubricate the housing O-rings with food-grade silicone grease (never petroleum jelly, which degrades the rubber).
Common Pitfalls & Troubleshooting
Even with a meticulous initial setup, specific mechanical failures present identical symptoms from the outside. Diagnosing reverse osmosis maintenance issues requires systematically isolating the flow path to find the exact component that failed.
The System Drains Continuously
- Symptom: You hear water running down the drain saddle non-stop, echoing in the pipe even when the tank is full and the faucet has been closed for hours.
- Fix: The most frequent real cause is a failed Automatic Shut-Off Valve (ASO). The ASO uses the back-pressure from a full holding tank to physically pinch off and close the incoming feed water line. If the rubber ASO diaphragm tears from pressure spikes, it never signals the system to stop producing water, sending endless gallons down the drain. Replace the four-way ASO valve on the top of the manifold.
Extremely Low Faucet Pressure
- Symptom: Water merely trickles from the dedicated drinking faucet, but if you lift the storage tank, it feels incredibly heavy and is completely full of water.
- Fix: The air bladder inside the hydropneumatic tank has lost its charge. Shut off the main feed valve, lock the faucet open, and use a standard bicycle pump to add air to the Schrader valve at the base of the tank until all the trapped water is forced out the faucet. Once entirely empty, set the final internal pressure to exactly 5-7 PSI. If the bladder is already ruptured (indicated by water spitting out of the Schrader air valve when you press the pin), the entire tank must be replaced.
Cloudy or Milky Water
- Symptom: Freshly dispensed water looks opaque white in the glass but clears from the bottom up after sitting still for sixty seconds.
- Fix: This is strictly trapped air, not a chemical contaminant or a failed filter. New carbon blocks and membranes hold microscopic air bubbles in their deep pores that are violently forced into the water under municipal pressure. This requires no mechanical fix; the system simply needs to push water through the manifold normally for a week to naturally flush the trapped air out of the housings.
FAQ
Can I install an RO system if I already have a water softener? Yes, and it is highly recommended by water treatment professionals. Softened water replaces hard calcium with soft sodium, which is vastly easier for an RO membrane to reject and flush away. A whole-home water softener in Leduc protects the RO unit from scale, and the under-sink RO unit then removes that residual sodium from your drinking water entirely.
How much wastewater does the system actually produce? Traditional passive systems produce roughly three to four gallons of reject water for every one gallon of purified permeate they capture. This brine stream is a mechanical necessity to wash the membrane surface and carry rejected contaminants to the drain. Upgraded tankless systems utilizing internal booster pumps can push harder against the membrane, reducing this waste ratio to a much more efficient 1:1.
Why does my new system take three hours to fill the tank? Cross-flow filtration at the 0.0001-micron level relies strictly on household water pressure to force molecules through microscopic pores. Without an electric booster pump, the dense membrane naturally restricts the flow to a slow, steady trickle. This is the standard, healthy operational speed for any passive point-of-use manifold.
Why is there a small hole on the side of my new RO faucet? That hole is an air gap, a critical plumbing mechanism designed for backflow prevention. If your home's main sewer line backs up and fills the kitchen sink, the air gap ensures that the dirty sink water breaks contact with the RO drain line, preventing raw sewage from siphoning backward into your clean drinking water filters.